There’s something truly magical about Easter gatherings—the way the table feels brighter, the laughter flows easier, and the treats seem all the more special. One of my favorite memories growing up was sneaking a colorful spoonful of Jell-O from my mom’s Easter dessert tray. It wasn’t just any Jell-O; it was this vibrant, layered parfait bursting with springtime colors and flavors that instantly brought smiles to everyone’s faces. If you’re looking for a simple, nostalgic, and crowd-pleasing dessert that’s perfect for Easter (or really any festive occasion), these Easter Jell-O Parfaits are exactly what you need. They’re quick to whip up, visually stunning, and most importantly, absolutely delicious!
Whether you’re planning a big family brunch or a small get-together with friends, these parfaits will add that perfect pop of color and sweetness. Plus, they’re super versatile, so you can easily tailor them to your taste or dietary needs. I’m excited to walk you through this recipe step-by-step, sprinkle in some helpful tips, and share ideas to make your parfaits stand out. Ready to dive in? Let’s make some magic in the kitchen!
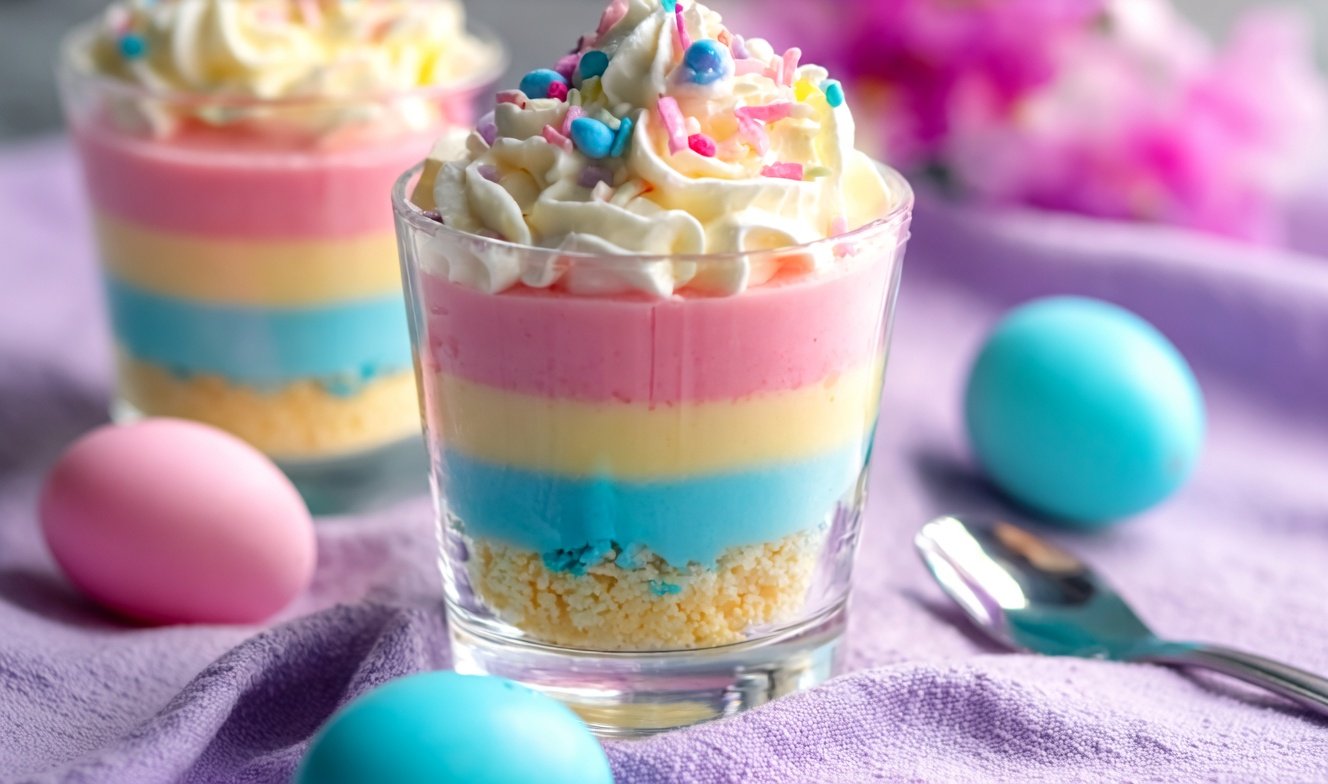
Why You’ll Love Easter Jell-O Parfaits
- Fast: From start to finish, these parfaits come together in under an hour of active prep time.
- Easy: No fancy equipment or baking skills needed—just a few bowls and some patience for setting.
- Giftable: Served in clear cups or pretty jars, they make adorable, edible gifts for neighbors or party guests.
- Crowd-pleasing: Kids and adults alike find these colorful layers irresistible and fun to eat.
Ingredients
Before we get started, let’s talk about the ingredients you’ll need. Each component brings something special to the parfait, and I love how simple and bright the list is:
- 1 box strawberry Jell-O: Sweet, classic, and perfect for that rosy pink layer.
- 1 box lemon Jell-O: Adds a zesty, refreshing tang and a sunny yellow hue.
- 1 box berry blue Jell-O: The vibrant blue color is a showstopper and tastes berry-licious.
- 3 cups boiling water: To dissolve each Jell-O flavor properly.
- 3 cups cold water: To balance the temperature and help the gelatin set.
- 1 cup whipped topping: Gives the parfait a creamy, fluffy texture and soft pastel layers.
- 1/2 cup vanilla yogurt (optional): Adds a subtle tang and richness, perfect if you want a lighter creamy layer.
- Fresh berries: Raspberries, strawberries, or blueberries work wonderfully as garnish and add a fresh bite.
- Sprinkles or mini marshmallows (optional): For that extra pop of fun and sweetness on top.
How to Make Easter Jell-O Parfaits
Now, let’s get to the fun part—building these beautiful layers! Don’t worry, it’s easier than it looks, and I’ll guide you every step of the way.
- Dissolve each Jell-O flavor separately: Start by pouring 1 cup of boiling water into a bowl with the strawberry Jell-O powder. Stir until completely dissolved. Repeat this process with the lemon and berry blue Jell-O in separate bowls.
- Add cold water: Stir 1 cup of cold water into each bowl. This helps lower the temperature and prepares the Jell-O for setting.
- Let the Jell-O cool: Allow the bowls to sit at room temperature for 20–30 minutes. You’re looking for a slightly thickened consistency—like a loose syrup. This step is key so your layers don’t mix when you pour them.
- Create creamy pastel layers (optional): For a dreamy, soft look and richer flavor, mix a portion of each cooled Jell-O with some whipped topping or vanilla yogurt. I usually do about half Jell-O and half whipped topping for a perfect creamy texture.
- Start layering: Pour your first layer of either plain or creamy Jell-O into clear cups. I love starting with strawberry, but you can choose any color. Aim for about 1/3 to 1/2 inch thick.
- Chill the first layer: Pop the cups into the fridge for about 20 minutes. The layer should be slightly set but not rock solid—that way, the next layer will stick nicely.
- Add a whipped topping layer: Spread a thin layer of whipped topping over the set Jell-O. This adds contrast in texture and flavor.
- Repeat layering: Alternate different Jell-O colors and creamy layers until your cup is full. Remember to chill for 20 minutes between layers to keep them neat and defined.
- Final chill: Once all layers are done, refrigerate the parfaits for 2 to 3 hours until fully set.
- Garnish and serve: Just before serving, top each parfait with a dollop of whipped cream, fresh berries, and a sprinkle of colorful sprinkles or mini marshmallows for that festive touch.
Substitutions & Additions
One of the things I love most about this recipe is how flexible it is. Here are some swaps and creative ideas to make the parfaits your own:
- Jell-O flavors: Feel free to mix up the flavors! Orange, lime, or grape Jell-O can add new colors and tastes.
- Gelatin alternatives: If you want a healthier or vegetarian option, try agar-agar powder instead of traditional gelatin. Just note the setting times and instructions differ.
- Yogurt variations: Greek yogurt, flavored yogurts, or dairy-free yogurts like coconut or almond can be used for the creamy layers.
- Whipped topping substitutes: Fresh whipped cream or coconut whipped cream are delicious alternatives.
- Add texture: Layer crushed graham crackers or granola between Jell-O layers for a delightful crunch.
- Adult twist: Mix a splash of liqueur (like Grand Marnier or Amaretto) into the Jell-O for an adult-friendly version.
Tips for Success
Since I’ve made these parfaits dozens of times, I’ve learned a few tricks that help everything come out perfect every time. Here’s what I recommend:
- Don’t rush the cooling: Letting the Jell-O thicken before pouring is crucial to getting clean, distinct layers.
- Use clear cups or glasses: This really highlights the beautiful colors and layers.
- Chill between layers: I can’t stress this enough! It keeps the layers from blending together and makes the presentation pop.
- Prep ahead: You can prepare all the Jell-O mixtures a day in advance and keep them covered in the fridge. When ready, assemble quickly.
- Keep it chilled: Serve the parfaits cold for the best texture and flavor.
How to Store Easter Jell-O Parfaits
These parfaits are best enjoyed fresh but can definitely be stored for convenience. Here’s how to keep them at their best:
- Cover each parfait cup tightly with plastic wrap or lids to prevent the whipped topping from drying out or absorbing fridge odors.
- Store in the refrigerator for up to 3 days. After that, the Jell-O may start to soften and the texture might change.
- If you want to prepare them well in advance, assemble the Jell-O layers but add the whipped topping and garnishes just before serving for maximum freshness.
FAQs
Q: Can I make these parfaits vegan?
A: Absolutely! Use agar-agar instead of gelatin and plant-based whipped toppings and yogurts. Just keep in mind agar sets differently, so check the package instructions.
Q: How long does the Jell-O take to set?
A: Each layer should chill for about 20 minutes to become slightly firm before adding the next. The entire parfait needs 2-3 hours to fully set.
Q: Can I use fresh fruit inside the layers?
A: It’s best to add fresh fruit on top to keep the layers smooth. Fresh berries inside may sink or affect setting.
Q: What if I don’t have whipped topping?
A: You can whip heavy cream at home or use yogurt for creamy layers. Even a dollop of cream cheese frosting can work for a richer taste!
Thanks for stopping by! If you’re as excited as I am about bringing some cheerful color and sweetness to your Easter table, this recipe is a must-try. Don’t forget to experiment with flavors and layers to make your parfaits truly your own. Happy Easter and happy layering!
For more inspiring recipes and festive ideas, be sure to follow my Pinterest board where I share all my favorite kitchen creations and seasonal treats.