Soft, Chewy, Healthy, and Perfect for Anytime Snacking
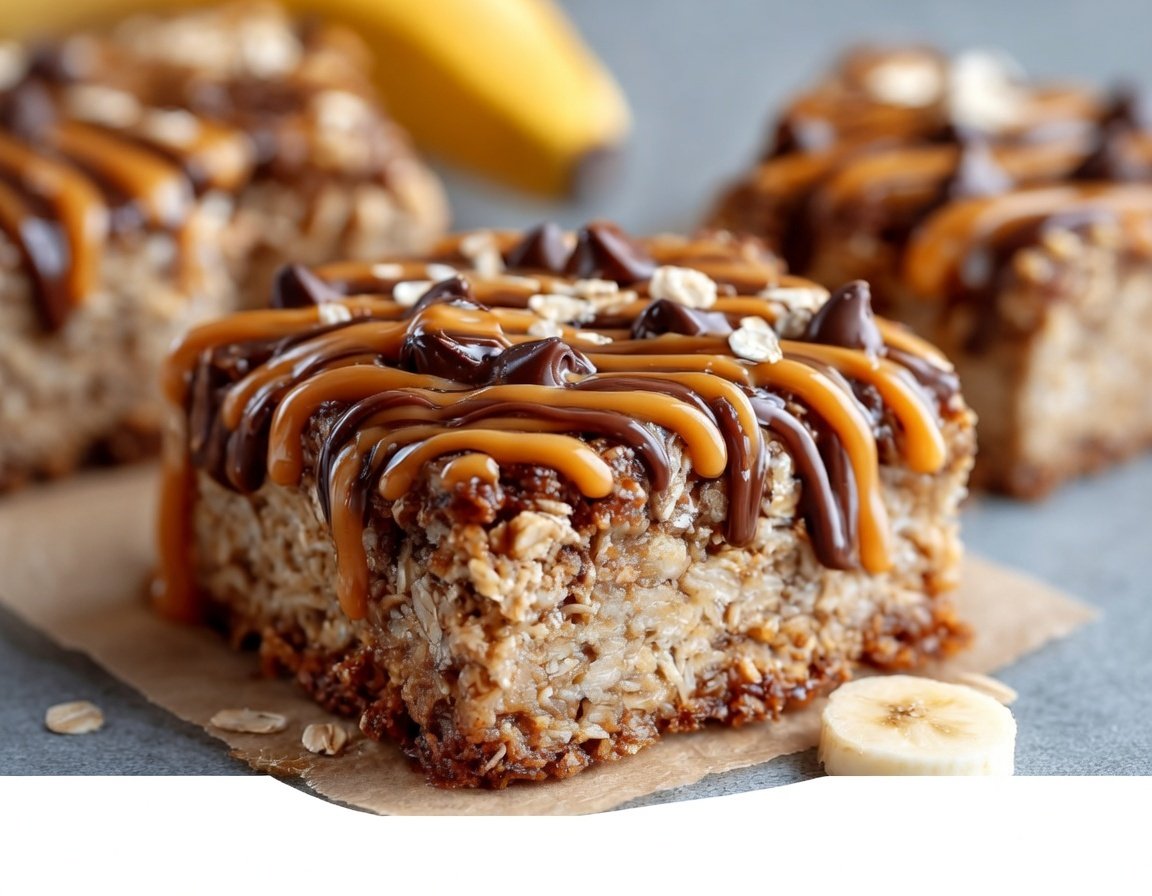
Peanut Butter Banana Oatmeal Bars are one of the most versatile and satisfying snacks you can make at home. They combine wholesome rolled oats, creamy peanut butter, and naturally sweet bananas into a soft, chewy bar that is perfect for breakfast, lunchboxes, workout fuel, or dessert. With a familiar flavor profile that feels just like a comforting peanut butter and banana sandwich but in a convenient baked form, they are both nutritious and delicious.
This recipe is particularly useful for anyone who loves baking with pantry staples. Ripe bananas that are too soft for slicing become the perfect natural sweetener, replacing the need for heavy refined sugars. Peanut butter brings richness, healthy fats, and extra protein, while oats provide complex carbohydrates and fiber to keep you energized. These bars hold together beautifully, store well for days, and freeze without losing texture or flavor.
Whether you are meal-prepping for the week or just looking for a simple treat the whole family will enjoy, these Peanut Butter Banana Oatmeal Bars are a top contender. The recipe itself is quick to prepare and uses minimal dishes, making it ideal for busy mornings or late-night baking sessions.
Below is the complete recipe with professional baking tips, ingredient substitutions, and variations to make this snack uniquely your own.
Why You Will Love Peanut Butter Banana Oatmeal Bars
There are many reasons this recipe becomes a household staple:
-
Nutritious ingredients support healthy snacking
-
Naturally sweetened with bananas and a small amount of honey or maple syrup
-
A great way to use ripe bananas instead of throwing them away
-
No mixer required; just stir everything together
-
Bakes into bars that hold their shape without crumbling
-
Customizable with add-ins like chocolate chips, nuts, dried fruits, or seeds
-
Perfect for breakfast-to-go, post-workout snacks, or a school-safe treat (if peanut-free substitution is used)
These bars strike a satisfying balance: they taste like a dessert but nourish like an energy bar.
Ingredients
This ingredient list is designed to be simple, accessible, and affordable. There are no speciality items required.
Main Ingredients
-
2 cups old-fashioned rolled oats
-
3 medium ripe bananas, mashed (about 1 to 1 1/4 cups mashed)
-
1/2 cup creamy peanut butter
-
1/4 cup honey or pure maple syrup
-
1 teaspoon vanilla extract
-
1 teaspoon ground cinnamon
-
1/2 teaspoon baking powder
-
1/4 teaspoon salt
Optional Add-Ins
Choose one or mix several for texture and flavor variety:
-
1/2 cup chocolate chips (milk, dark, or semi-sweet)
-
1/4 cup chopped peanuts or almonds
-
1/4 cup shredded coconut
-
2 tablespoons chia seeds or ground flaxseed for added fiber
-
1/2 cup dried fruit such as cranberries or raisins
Topping Options
-
Additional drizzle of melted peanut butter
-
Sprinkle of oats or mini chocolate chips
-
Thin banana slices pressed lightly into the top before baking
Equipment Needed
-
8×8 inch baking pan (or similar small square dish)
-
Parchment paper or oil for greasing
-
Mixing bowl and spatula
-
Measuring cups and spoons
-
Oven, set to 350°F (175°C)
Step-by-Step Instructions
Step 1: Prepare the Pan
Preheat your oven to 350°F (175°C).
Line your baking pan with parchment paper, allowing a small overhang on two sides so the bars can be easily lifted out later. If not using parchment, grease the pan lightly with oil or non-stick spray. This step prevents sticking and ensures clean slices.
Step 2: Mash the Bananas
In a large mixing bowl, peel and mash the ripe bananas until mostly smooth. A fork or potato masher works well for this. A few small lumps are perfectly fine and add texture.
Ripe bananas not only offer the best sweetness but also provide moisture to help the bars stay tender.
Step 3: Add Wet Ingredients
To the mashed bananas, add:
-
Peanut butter
-
Honey or maple syrup
-
Vanilla extract
Mix until fully combined and creamy. The peanut butter should blend effortlessly with the bananas, making a slightly thick but pourable base.
Step 4: Incorporate Dry Ingredients
Sprinkle in:
-
Rolled oats
-
Cinnamon
-
Baking powder
-
Salt
Stir until all oats are coated and the mixture thickens. The consistency should resemble a sticky oatmeal mixture instead of a loose batter. Let the mixture sit for 2–3 minutes to allow oats to begin absorbing moisture.
Step 5: Stir In Optional Add-Ins
If using chocolate chips, nuts, or dried fruit, fold them in now. The mixture will be thick but manageable.
Adding extras is an easy way to make each batch slightly different depending on cravings or the season.
Step 6: Transfer to Pan
Scoop the mixture into the prepared pan and spread into an even layer. Press down firmly with a spatula or damp fingertips to compact the mixture. This step helps ensure your bars hold together after baking.
If using toppings, add them before baking and gently press them into the surface.
Step 7: Bake
Place the pan into the preheated oven and bake for 22–28 minutes. Check around the 22-minute mark.
Signs the bars are done:
-
Lightly golden around edges
-
Surface is set and no longer glossy
-
Slight bounce when pressed gently
Avoid overbaking, as it can make the bars dry.
Step 8: Cool and Slice
Remove from the oven and allow the bars to cool in the pan for at least 20 minutes. Lift the parchment edges to transfer the slab to a cutting surface. Slice into 9 large or 12 smaller bars.
These bars firm up as they cool, making handling and slicing easier.
Serving Ideas
Peanut Butter Banana Oatmeal Bars can be enjoyed straight out of the pan, but here are a few fun serving suggestions:
-
Serve warm with a glass of cold milk for a comforting breakfast
-
Spread with extra peanut butter or almond butter before eating
-
Warm and top with yogurt and fruit for a parfait-style snack
-
Pair with coffee or tea for a quick mid-morning energy boost
-
Crumble a bar over Greek yogurt for dessert
They are excellent for grab-and-go nutrition when time is short.
Recipe Tips for Success
-
Use bananas with brown spots for optimal sweetness and texture
-
Do not use quick oats; rolled oats provide better structure
-
Allow bars to cool fully before slicing to prevent breakage
-
For a firmer bar texture, refrigerate them after slicing
-
If your peanut butter is very thick, warm it slightly before mixing
These practical adjustments lead to consistently great results.
Flavor Variations
This is an incredibly adaptable recipe. Try different twists:
Double Chocolate Banana Bars
Add:
-
2 tablespoons cocoa powder
-
Extra handful of chocolate chips
Peanut-Free Sunflower Oat Bars
Replace peanut butter with sunflower seed butter
A great option for nut-free school snacks.
Berry and Banana Bars
Fold in:
-
1/2 cup fresh or frozen blueberries or strawberries (chopped)
High-Protein Bars
Add:
-
1/4 cup vanilla protein powder
-
One extra tablespoon peanut butter
Adjust sweetness as needed, since protein powder varies.
Trail Mix Style Bars
Mix in:
-
Chocolate chips
-
Chopped nuts
-
Raisins or cranberries
-
Pumpkin seeds
Packed with textures and nutrients.
Storage and Freezer Instructions
These bars are extremely meal prep friendly.
Room Temperature
Store covered in an airtight container:
-
Up to 3 days on the counter
Refrigerator
Great for maintaining firmness:
-
Up to 1 week
Freezer
Excellent for long-term storage:
-
Freeze individually wrapped slices for up to 3 months
-
Thaw at room temperature or microwave 20–30 seconds
Freezing does not negatively affect texture or flavor.
Nutrition Estimate (Per Bar)
Based on slicing into 12 bars:
-
Calories: 150–180
-
Protein: 4–6 grams
-
Carbohydrates: 22–25 grams
-
Fiber: 3–4 grams
-
Fat: 7–9 grams
-
Natural sugars from bananas and optional honey or maple syrup
Exact numbers depend on add-ins and peanut butter type.
Frequently Asked Questions
Can I use instant oats?
You can, but the bars may become softer and less chewy. Rolled oats are recommended.
Are the bars gluten-free?
Yes, if certified gluten-free oats are used.
Can I use crunchy peanut butter?
Yes, it adds pleasant peanut texture.
Can I skip the honey or syrup?
Yes, but bars will be less sweet and may not bind as well.
Do bananas need to be extremely ripe?
Very ripe bananas work best for flavor and moisture.
Can I add sugar or chocolate drizzle to make them sweeter?
Absolutely. Drizzle melted chocolate or add a sprinkle of brown sugar before baking if you prefer a sweeter treat.
Why These Bars Are Worth Making Again and Again
Peanut Butter Banana Oatmeal Bars are one of those recipes that checks every box:
-
Easy enough for beginners to prepare in minutes
-
Wholesome yet indulgent in flavor
-
An ideal use for leftover bananas
-
Adaptable to any diet, taste preference, or pantry ingredients
-
Portable and kid-friendly
They provide the energy you need to start the day strong or power through a long afternoon. They are familiar yet satisfying, healthy yet decadent, and flexible for endless personalization.
Once you make these bars, they will likely become a repeat addition to your baking rotation, especially any time ripe bananas are waiting on the counter.
Final Thoughts
Peanut Butter Banana Oatmeal Bars blend simplicity with nourishment in a way that makes them impossible not to love. This recipe delivers convenience and comfort in every bite, while still aligning with healthier snacking goals. With only a handful of ingredients and one mixing bowl needed, they are a practical baking choice for even the busiest household.
Each bite is soft, chewy, full of peanut butter flavor, and naturally sweetened by bananas. They are wonderful fresh from the oven or chilled throughout the week. Whether you follow the recipe exactly or customize it with your favorite toppings and extras, you will enjoy a snack that feels homemade, wholesome, and deeply satisfying.