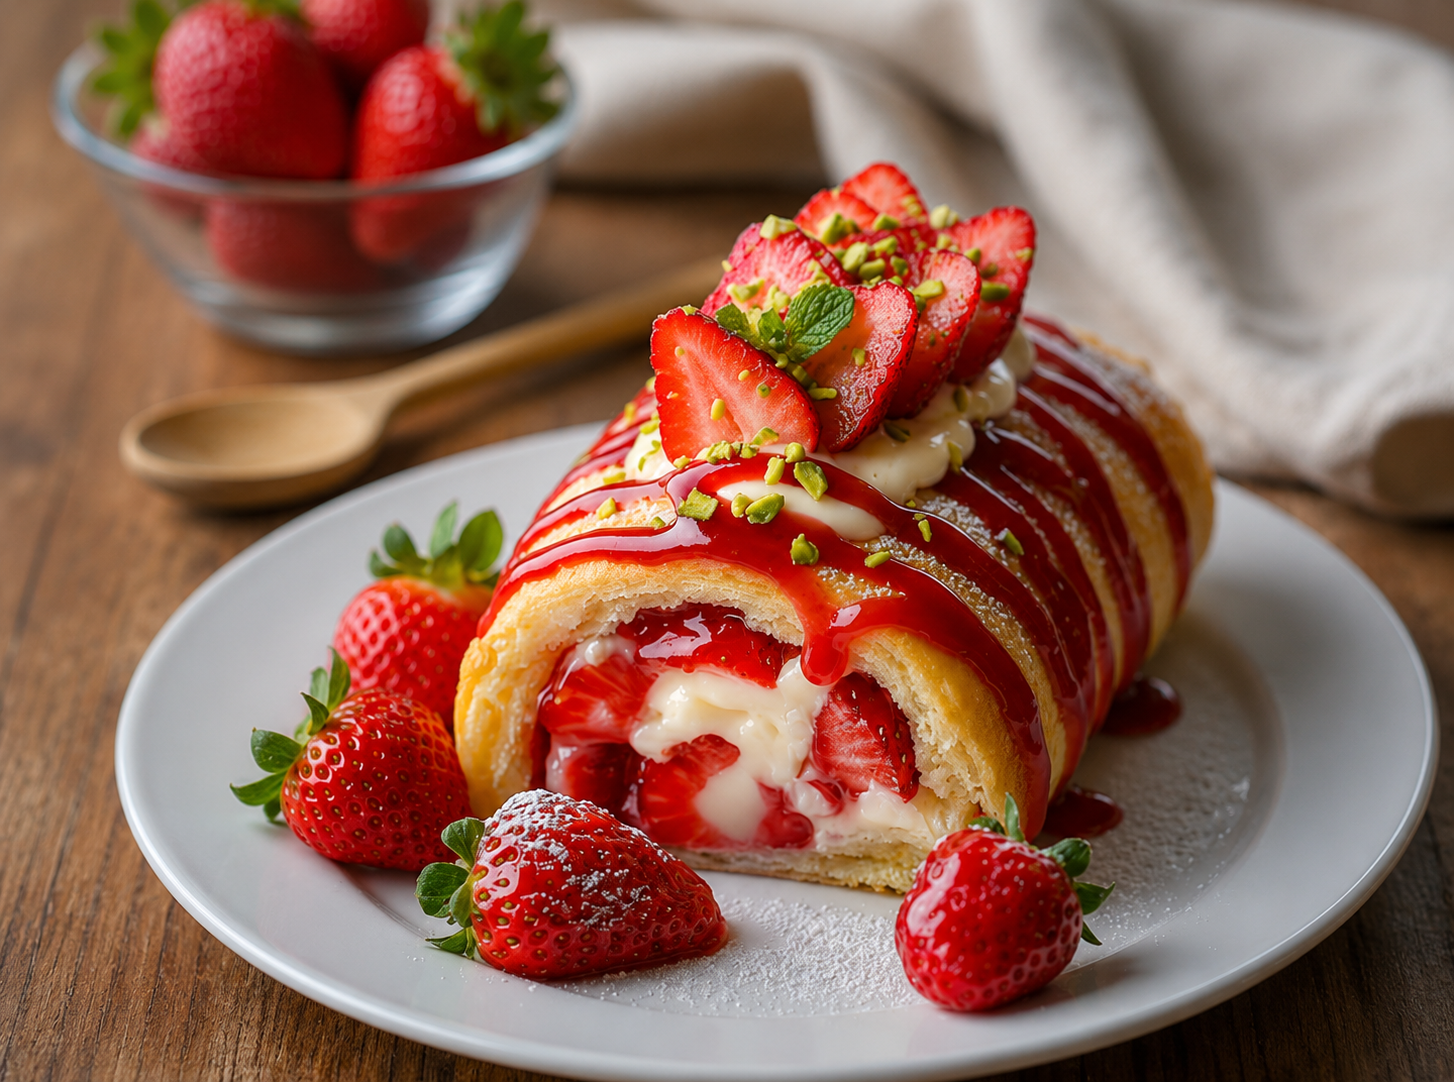
Strawberry Cream Swiss Roll
Servings
8–10 Slices
Prep Time
30 Minutes
Bake Time
12 Minutes
Chill Time
2 Hours
Total Time
2 Hours 42 Minutes
Ingredients
For the Sponge Cake
- 4 large eggs
- ¾ cup (150 g) granulated sugar
- 1 tsp vanilla extract
- ¾ cup (95 g) cake flour
- 1 tsp baking powder
- ¼ tsp salt
- 2 tbsp whole milk
- 2 tbsp unsalted butter, melted
For the Vanilla Cream Filling
- 1½ cups (360 ml) heavy whipping cream
- ¼ cup (30 g) powdered sugar
- 1 tsp vanilla extract
For the Strawberry Filling
- 2 cups (300 g) fresh strawberries, diced
- 2 tbsp sugar
- 1 tbsp lemon juice
For the Strawberry Glaze
- 1 cup (240 ml) strawberry puree
- 2 tbsp sugar
- 1 tbsp cornstarch
- 2 tbsp water
Garnish
- Fresh strawberry slices
- Chopped pistachios
- Mint leaves
- Powdered sugar
Instructions
Step 1 – Prepare the Sponge Cake
- Preheat oven to 350°F (175°C).
- Line a 10×15-inch jelly roll pan with parchment paper.
- Beat eggs and sugar until pale, thick, and tripled in volume.
- Mix in vanilla extract.
- Sift flour, baking powder, and salt together.
- Fold dry ingredients gently into the egg mixture.
- Add milk and melted butter.
- Spread evenly in prepared pan.
Step 2 – Bake
- Bake for 10–12 minutes until lightly golden.
- Turn cake onto a clean towel dusted with powdered sugar.
- Remove parchment paper.
- Roll cake gently while warm.
- Let cool completely.
Step 3 – Make the Strawberry Filling
- Combine strawberries, sugar, and lemon juice.
- Let sit for 15 minutes.
- Drain excess liquid.
Step 4 – Prepare the Cream
- Whip heavy cream until soft peaks form.
- Add powdered sugar and vanilla.
- Continue whipping until medium peaks form.
Step 5 – Assemble the Roll
- Carefully unroll cooled cake.
- Spread whipped cream evenly.
- Distribute diced strawberries over cream.
- Roll cake tightly.
- Wrap and refrigerate for at least 2 hours.
Step 6 – Make the Strawberry Glaze
- Combine strawberry puree, sugar, cornstarch, and water.
- Cook over medium heat.
- Stir until thick and glossy.
- Cool slightly.
Step 7 – Decorate
- Drizzle strawberry glaze over chilled roll.
- Pipe extra whipped cream on top.
- Arrange fresh strawberry slices.
- Sprinkle chopped pistachios.
- Garnish with mint leaves.
- Dust lightly with powdered sugar.
Storage
- Refrigerator: up to 3 days
- Best served chilled
Nutrition (Approximate Per Slice)
- Calories: 310 kcal
- Protein: 5 g
- Carbohydrates: 32 g
- Fat: 18 g
- Sugar: 21 g
Tips for Success
- Roll the sponge while warm to prevent cracking.
- Use cold cream for better whipping.
- Pat strawberries dry before filling.
- Chill thoroughly before slicing for clean cuts.
- Use fresh strawberries for the brightest flavor.
Why You’ll Love This Recipe
✔ Light and fluffy sponge cake
✔ Fresh strawberry pieces in every bite
✔ Rich vanilla whipped cream filling
✔ Beautiful glossy strawberry topping
✔ Perfect for spring and summer gatherings
✔ Bakery-style presentation with minimal effort
This dessert closely resembles a Strawberry Cream Swiss Roll, filled with fresh strawberries and vanilla cream, then finished with a vibrant strawberry glaze, fresh berries, pistachios, and mint for an elegant bakery-style appearance.
Tropical Coconut Mousse Dessert


Tropical Coconut Mousse Dessert
Servings
4–6 Servings
Prep Time
25 Minutes
Chill Time
4 Hours
Total Time
4 Hours 25 Minutes
Ingredients
For the Coconut Shell Presentation
- 2 coconut halves, cleaned
- Toasted coconut flakes for garnish
For the Coconut Mousse
- 1 cup (240 ml) coconut cream
- 8 oz (225 g) cream cheese, softened
- ½ cup (60 g) powdered sugar
- 1 tsp vanilla extract
- 1 cup (240 ml) heavy whipping cream
For the Vanilla Sponge Cubes
- 1 cup prepared vanilla sponge cake, cut into cubes
For the Toasted Meringue
- 2 egg whites
- ¼ cup (50 g) granulated sugar
- ¼ tsp cream of tartar
Raspberry Sauce
- 1 cup (120 g) raspberries
- 2 tbsp sugar
- 1 tbsp lemon juice
Chocolate Truffles
- 4 small chocolate truffles
Garnish
- Edible flowers (pansies or violas)
- Gold leaf (optional)
- Fresh mint leaves
Instructions
Step 1 – Prepare the Raspberry Sauce
- Combine raspberries, sugar, and lemon juice in a saucepan.
- Simmer for 5–7 minutes.
- Blend until smooth.
- Strain to remove seeds.
- Chill until needed.
Step 2 – Make the Coconut Mousse
- Beat cream cheese until smooth.
- Add powdered sugar and vanilla.
- Mix in coconut cream.
- In a separate bowl, whip heavy cream to stiff peaks.
- Fold whipped cream into coconut mixture.
- Refrigerate for 30 minutes.
Step 3 – Prepare the Meringue
- Beat egg whites and cream of tartar until foamy.
- Gradually add sugar.
- Continue beating until glossy stiff peaks form.
- Pipe or spoon onto a baking sheet.
- Torch lightly or broil briefly until golden.
Step 4 – Assemble the Dessert
- Spoon coconut mousse into the coconut shell.
- Insert vanilla sponge cubes into the mousse.
- Add a toasted meringue swirl.
- Place a chocolate truffle on top.
- Decorate with edible flowers and a touch of gold leaf.
Step 5 – Plate
- Spoon raspberry sauce onto serving plates.
- Create a decorative swirl.
- Place the filled coconut shell in the center.
- Garnish with extra flowers and mint.
Storage
- Refrigerate up to 2 days.
- Best enjoyed fresh.
Nutrition (Approximate Per Serving)
- Calories: 420 kcal
- Protein: 5 g
- Carbohydrates: 28 g
- Fat: 32 g
- Sugar: 20 g
Tips for Success
- Use full-fat coconut cream for the richest texture.
- Chill the mousse before assembling.
- Torch the meringue just before serving.
- Edible flowers should be food-grade and thoroughly cleaned.
- For a restaurant-style finish, apply gold leaf sparingly.
Why You’ll Love This Recipe
✔ Elegant fine-dining presentation
✔ Light and creamy coconut mousse
✔ Bright raspberry contrast
✔ Toasted meringue adds texture and flavor
✔ Beautiful edible flower garnish
✔ Perfect for special occasions and dinner parties
This dessert is inspired by a Tropical Coconut Mousse served in a coconut shell, featuring silky coconut mousse, vanilla sponge cake, toasted meringue, chocolate truffles, raspberry sauce, and colorful edible flowers for a stunning plated presentation.
Crispy Wonton Potato Cups with Caramelized Onions


Crispy Wonton Potato Cups with Caramelized Onions
Servings
12 Appetizer Cups
Prep Time
20 Minutes
Cook Time
35 Minutes
Total Time
55 Minutes
Ingredients
For the Crispy Wonton Cups
- 12 wonton wrappers
- 1 tbsp olive oil
For the Creamy Mashed Potato Filling
- 2 large Yukon Gold potatoes, peeled and cubed
- 3 tbsp unsalted butter
- ¼ cup (60 ml) heavy cream
- ½ tsp garlic powder
- Salt and black pepper to taste
For the Caramelized Onion Topping
- 2 tbsp butter
- 1 medium onion, finely diced
- 1 tbsp brown sugar
- 1 tbsp balsamic vinegar
- ½ tsp thyme leaves
- Salt and pepper to taste
Garnish
- Crispy fried onion strings
- Chopped chives
- Extra balsamic glaze
Instructions
Step 1 – Make the Wonton Cups
- Preheat oven to 375°F (190°C).
- Lightly brush both sides of each wonton wrapper with olive oil.
- Press wrappers into a muffin tin to form cups.
- Bake for 8–10 minutes until golden and crispy.
- Remove and cool completely.
Step 2 – Prepare the Mashed Potatoes
- Boil potatoes in salted water for 15–20 minutes until tender.
- Drain thoroughly.
- Mash until smooth.
- Add butter, cream, garlic powder, salt, and pepper.
- Mix until silky and creamy.
Step 3 – Caramelize the Onions
- Melt butter in a skillet over medium-low heat.
- Add diced onions.
- Cook slowly for 15–20 minutes, stirring occasionally.
- Add brown sugar and balsamic vinegar.
- Continue cooking until onions are deeply golden and jam-like.
- Season with thyme, salt, and pepper.
Step 4 – Assemble
- Spoon mashed potatoes into each crispy wonton cup.
- Top with a generous spoonful of caramelized onions.
- Add crispy onion strings.
- Sprinkle with fresh chives.
- Drizzle lightly with balsamic glaze.
Storage
- Best served immediately.
- Wonton cups can be baked 1 day ahead and stored airtight.
- Filling can be refrigerated for up to 3 days.
Nutrition (Approximate Per Cup)
- Calories: 115 kcal
- Protein: 2 g
- Carbohydrates: 14 g
- Fat: 5 g
- Fiber: 1 g
Tips for Success
- Use Yukon Gold potatoes for extra creamy texture.
- Do not rush the onions; slow cooking creates the best flavor.
- Fill cups just before serving to keep them crisp.
- Pipe mashed potatoes with a pastry bag for a restaurant-style presentation.
- Garnish at the last minute for maximum crunch.
Why You’ll Love This Recipe
✔ Crispy and creamy in every bite
✔ Elegant party appetizer
✔ Rich caramelized onion flavor
✔ Easy to prepare ahead
✔ Restaurant-quality presentation
✔ Perfect for holidays, brunches, and dinner parties
This appetizer resembles a gourmet Crispy Wonton Potato Cup, featuring a golden crunchy shell filled with smooth mashed potatoes, topped with sweet balsamic caramelized onions, crispy onion strings, and fresh chives.
Honey-Poached Pears with Blue Cheese, Berries & Walnuts


Honey-Poached Pears with Blue Cheese, Berries & Walnuts
Servings
4 Servings
Prep Time
15 Minutes
Cook Time
25 Minutes
Total Time
40 Minutes
Ingredients
For the Honey-Poached Pears
- 4 ripe but firm pears, halved and cored
- 2 cups (480 ml) water
- ⅓ cup (110 g) honey
- 1 cinnamon stick
- 1 tsp vanilla extract
- 2 strips lemon peel
For the Garnish
- ½ cup (60 g) blue cheese, crumbled
- ½ cup (50 g) walnuts, toasted
- ½ cup (75 g) fresh blackberries
- ½ cup (75 g) fresh raspberries
- Fresh mint leaves
Honey Drizzle
- 3 tbsp honey
- 1 tsp lemon juice
Optional Finishing Spice
- Freshly cracked black pepper
- Pinch of cinnamon
Instructions
Step 1 – Prepare the Poaching Liquid
- In a saucepan combine water, honey, cinnamon stick, vanilla, and lemon peel.
- Bring to a gentle simmer over medium heat.
Step 2 – Poach the Pears
- Add pear halves to the liquid.
- Reduce heat to low.
- Simmer for 15–20 minutes until tender but still holding their shape.
- Remove pears and allow to cool slightly.
Step 3 – Toast the Walnuts
- Heat a dry skillet over medium heat.
- Toast walnuts for 3–4 minutes until fragrant.
- Cool completely.
Step 4 – Make the Honey Drizzle
- Mix honey and lemon juice.
- Stir until smooth.
Step 5 – Assemble
- Arrange pear halves on a serving platter.
- Scatter blue cheese around and over the pears.
- Add blackberries and raspberries.
- Sprinkle toasted walnuts.
- Drizzle generously with honey mixture.
- Finish with mint leaves and a light crack of black pepper.
Storage
- Refrigerate for up to 2 days.
- Best served slightly chilled or at room temperature.
Nutrition (Approximate Per Serving)
- Calories: 280 kcal
- Protein: 5 g
- Carbohydrates: 32 g
- Fat: 15 g
- Fiber: 6 g
Tips for Success
- Use Bosc or Anjou pears for the best texture.
- Do not overcook the pears or they may become mushy.
- Toasting walnuts greatly enhances flavor.
- Serve with a dessert wine or sparkling water.
- Add a few drops of balsamic glaze for extra depth.
Why You’ll Love This Recipe
✔ Elegant restaurant-style presentation
✔ Sweet, savory, and tangy flavor combination
✔ Creamy blue cheese contrast
✔ Fresh berries add brightness
✔ Naturally gluten-free
✔ Perfect for dinner parties and holiday gatherings
This dish resembles a sophisticated Honey-Poached Pears with Blue Cheese and Berries, combining tender pears, creamy blue cheese, toasted walnuts, fresh berries, and a delicate honey drizzle for a beautiful gourmet appetizer or light dessert.