This doesn’t even look like a regular appetizer anymore.
This looks like something a chef places carefully on the table while explaining the flavor profile in a soft voice.
And honestly?
They’d be justified.
Because this dish looks insanely sophisticated.
You’ve got:
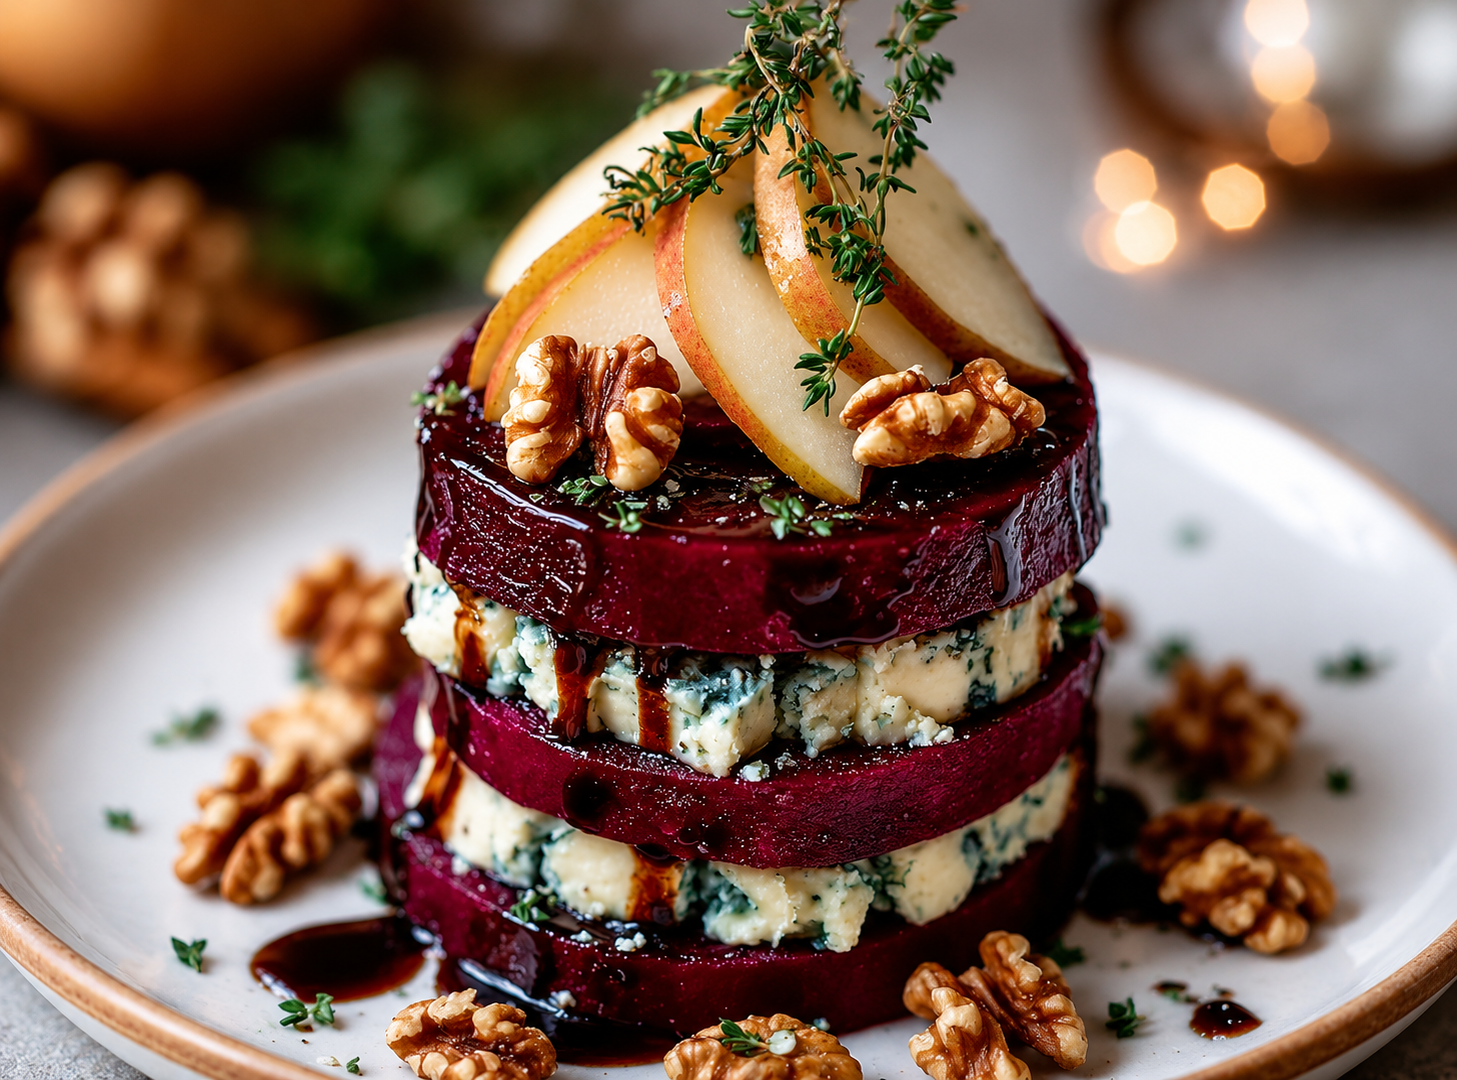
- glossy roasted beet layers
- creamy blue cheese filling
- fresh sliced pears
- crunchy walnuts
- balsamic drizzle
- delicate thyme garnish
Everything about this screams:
“expensive restaurant with mood lighting.”
❤️ The Beet Layers Look Absolutely Stunning
The beets are carrying the visual drama HARD.
That deep ruby-purple color is gorgeous.
And the shine from the glaze makes them look almost jewel-like.
Roasted beets already have:
- natural sweetness
- earthy depth
- soft texture
- rich color
But stacked like this?
Now they look like edible architecture.
🧀 The Blue Cheese Adds Serious Luxury Energy


Blue cheese instantly changes the entire flavor profile.
Because now the dish becomes:
- creamy
- sharp
- salty
- rich
- deeply savory
And against sweet earthy beets?
That contrast is elite.
You need bold cheese to stand up against roasted beet flavor, and this pairing honestly looks perfect.
Probably:
- gorgonzola
- Danish blue
- Roquefort
- whipped blue cheese mousse
Whatever it is…
it looks ridiculously creamy.
🍐 The Pears Were Such A Smart Addition
The pears completely soften the intensity of the dish.
They add:
- freshness
- sweetness
- juiciness
- light floral flavor
And visually?
Those pale pear slices against the dark beets create such an elegant contrast.
This feels very autumn dinner party coded.
🌰 Walnuts Make Everything Better
Walnuts and blue cheese are basically soulmates at this point.
The walnuts bring:
- crunch
- nuttiness
- warmth
- texture balance
Without them, the dish would be mostly soft textures.
But those toasted walnuts make every bite feel layered and complete.
🍷 That Balsamic Drizzle Looks Unreal
That glossy dark drizzle over the stack is doing major work visually.
Balsamic with beets and blue cheese is honestly one of the best flavor combinations ever:
- sweet
- tangy
- earthy
- creamy
- rich
Every ingredient balances another ingredient perfectly.
That’s why this looks so refined.
🌿 The Thyme Garnish Makes It Feel Straight Out Of A Michelin Restaurant
Those tiny thyme sprigs are subtle…
but they completely elevate the presentation.
Now it feels:
- intentional
- curated
- elegant
- seasonal
Fresh herbs always make dishes look more alive.
And thyme works perfectly with:
- roasted vegetables
- pears
- walnuts
- creamy cheeses
This pairing makes total sense.
✨ This Looks Like Edible Art
The stacking alone makes this dish feel luxurious.
It’s symmetrical.
Layered.
Color-balanced.
Everything feels carefully placed.
This is definitely the kind of plate people pause to admire before eating because it’s genuinely beautiful.
🍂 This Is Peak Fall Fine-Dining Energy
Everything here screams:
- autumn evenings
- wine pairings
- candlelit dinners
- cozy upscale restaurants
- harvest season menus
Warm earthy ingredients always hit differently during colder months.
And this dish captures that vibe perfectly.
📸 The Colors Are Absolutely Gorgeous
The visual contrast is insane:
- deep burgundy beets
- creamy blue cheese
- golden walnuts
- pale pears
- green thyme
Every color complements another one.
This looks like the kind of food photo people instantly save for “future dinner party inspiration.”
😭 Imagine The First Bite
You’d get:
- soft roasted beet
- creamy tangy blue cheese
- sweet juicy pear
- crunchy walnut
- balsamic richness
- aromatic thyme
Sweet.
Savory.
Earthy.
Creamy.
Crunchy.
Fresh.
That flavor balance is honestly chef-level.
🌟 Final Thoughts
This beet, blue cheese, and pear stack looks:
- elegant
- dramatic
- luxurious
- earthy
- sophisticated
- ridiculously gourmet
Honestly this feels less like an appetizer…
and more like a centerpiece designed to flex culinary talent.
Blueberry Lava Cheesecake Mochi
Blueberry Lava Cheesecake Mochi


Prep Time
- Prep: 45 minutes
- Chill: 4 hours
- Cook: 15 minutes
Servings
Makes 6 blueberry mochi cheesecake domes.
Ingredients
For the Blueberry Compote Center
- 1 1/2 cups fresh blueberries
- 3 tbsp sugar
- 1 tbsp lemon juice
- 1 tsp cornstarch
- 1 tbsp water
For the Cheesecake Filling
- 8 oz cream cheese, softened
- 1/3 cup powdered sugar
- 1 tsp vanilla extract
- 1/2 cup whipped cream
For the Blue Mochi Layer
- 1 cup glutinous rice flour
- 1/4 cup sugar
- 1 cup milk
- 1 tbsp butter
- Blue food coloring or blueberry powder
Decoration
- Fresh blueberries
- Powdered sugar (optional)
Instructions
Step 1: Make the Blueberry Lava Center
- Add blueberries, sugar, and lemon juice to a saucepan.
- Cook over medium heat for 5–7 minutes until juicy.
- Mix cornstarch with water and pour into the berries.
- Stir until thick and glossy.
- Let cool completely.
- Spoon small portions onto a tray and freeze for 1 hour.
Step 2: Prepare the Cheesecake Filling
- Beat cream cheese until smooth.
- Add powdered sugar and vanilla.
- Fold in whipped cream gently.
- Chill until slightly firm.
Step 3: Make the Mochi Dough
- In a microwave-safe bowl, combine glutinous rice flour, sugar, and milk.
- Add a few drops of blue food coloring.
- Mix until smooth.
- Cover loosely and microwave for 2 minutes.
- Stir carefully, then microwave another 1–2 minutes until sticky and glossy.
- Add butter and knead while warm.
- Dust with cornstarch to prevent sticking.
Step 4: Assemble the Dessert
- Flatten a piece of mochi dough into a circle.
- Add cheesecake filling in the center.
- Place a frozen blueberry compote portion inside.
- Cover with more cheesecake filling if needed.
- Carefully wrap and seal the mochi around the filling.
- Shape into smooth spheres.
Step 5: Chill & Serve
- Refrigerate for at least 2 hours.
- Slice carefully before serving for the lava effect.
- Garnish with fresh blueberries.
Tips for the Perfect Lava Effect
- Freeze the blueberry center before assembling.
- Chill the finished mochi well so it slices cleanly.
- Use full-fat cream cheese for a richer texture.
Flavor Variations
Strawberry Lava Mochi
Replace blueberries with strawberries.
Matcha Blueberry Mochi
Add matcha powder to the cheesecake filling.
White Chocolate Blueberry
Mix melted white chocolate into the cream cheese layer.
Why This Dessert Is Special
This dessert combines soft chewy mochi, creamy cheesecake, and a rich blueberry lava center in one elegant bite. The smooth blue shell and glossy berry filling create a stunning modern dessert that looks bakery-quality but can still be made at home.
Mini Lemon Cheesecakes
Mini Lemon Cheesecakes


Prep Time
- Prep: 25 minutes
- Bake: 25 minutes
- Chill: 3 hours
Servings
Makes 8 mini cheesecakes.
Ingredients
For the Crust
- 1 cup graham cracker crumbs
- 3 tbsp melted butter
- 2 tbsp sugar
For the Cheesecake Filling
- 16 oz cream cheese, softened
- 1/2 cup sugar
- 2 eggs
- 1/3 cup sour cream
- 2 tbsp heavy cream
- 2 tbsp fresh lemon juice
- 1 tbsp lemon zest
- 1 tsp vanilla extract
For Garnish
- Lemon slices
- Powdered sugar
- Fresh mint leaves (optional)
Instructions
Step 1: Prepare the Crust
- Preheat oven to 325°F (160°C).
- Line a muffin pan with cupcake liners.
- Mix graham cracker crumbs, melted butter, and sugar.
- Press mixture firmly into the bottom of each liner.
- Bake for 5 minutes, then let cool.
Step 2: Make the Cheesecake Filling
- Beat cream cheese until smooth and creamy.
- Add sugar and mix well.
- Add eggs one at a time.
- Mix in sour cream, heavy cream, lemon juice, lemon zest, and vanilla.
- Stir until silky smooth without overmixing.
Step 3: Bake
- Pour cheesecake filling over the crusts.
- Fill each cup nearly to the top.
- Bake for 18–22 minutes until the centers are slightly jiggly.
- Turn off oven and leave cheesecakes inside for 10 minutes.
Step 4: Chill
- Remove from oven and cool completely.
- Refrigerate for at least 3 hours or overnight for best texture.
Step 5: Decorate & Serve
- Dust with powdered sugar.
- Top with lemon slices and mint leaves.
- Serve chilled.
Tips for Perfect Cheesecake
- Use room-temperature cream cheese for a smoother filling.
- Do not overbake; the center should still wobble slightly.
- Chill overnight for the creamiest texture.
Flavor Variations
Blueberry Lemon Cheesecake
Top with blueberry sauce before serving.
Lemon Coconut Cheesecake
Add shredded coconut to the crust.
Honey Lemon Cheesecake
Replace part of the sugar with honey for a softer citrus sweetness.
Why This Dessert Is So Popular
These mini lemon cheesecakes combine rich creamy texture with fresh citrus flavor in perfectly portioned servings. The buttery crust, tangy lemon filling, and powdered sugar topping create a refreshing dessert that feels light yet indulgent.